Tuesday, December 5, 2017

Some progress

It has been a bit quiet here on the blog lately. The reason is that the progress with the boat has been a bit slow. Things doesn't always go as you plan, not even as you hope or dream. 

Today I reached one milestone when the boat was lifted into the cold sea to check how she floats and if the waterline is on correct level.


After last post the deck has been installed.


As well as tubing for the cables.


In the picture below you see some storage space, in the front step and in the middle below the floor. And in the stern the space for the fuel tank.
 

Here I try to form the space at the stern.


This is how she looks today. Next in turn is to attach the back bench and build the control and navigator desks.


Today we lifted her into the right element to check how she floats and if the water line is on the correct level.


All the guys in the boat are simulating engine, fuel tank and control and navigator desks. As she was lifted to day we also checked her weight which was about 500 kg at this point.


I'm afraid there will again be a pause before there is something to tell you on this project, but as soon as I have something to show you I will update you.

Merry Christmas and A Happy New Year to you all readers.


Wednesday, March 15, 2017

Interior is taking some shape

Today we got the floor almost formed and it helped visualize the boat in a better way.


After we turned the boat and started with the inside, the first thing was to fix the supporting strips for the side deck.


The inner sides also need their supporting strips. The construction will be with double walls and air filled compartments for ensuring the enough floating capacity.


The transom also needed some more stiffness to carry the motor. These boards where glued with epoxy.


Ensuring that the fuel tank will fit into the planned compartment under the floor. 


After the supporting parts on the inside were ready it was time to seal all surfaces with epoxy. One learning was that epoxy could have been applied before the supporting strips where attached, it would have been a bit easier.


Following step was then to start forming the floor. Below you see how we planned the front part with the help of a model made of some strips.


Below the result of today's work. Tomorrow still some tuning to get the floor to fit as it should. Then the floor need to be sealed with some epoxy before it can be attached.


Thursday, March 2, 2017

One milestone reached

Hi and sorry for being quiet for a while. 

This week we reached one major milestone when we got the hull turned in right position for a boat.


The laminating of the hull has taken longer than originally planned.


First layer of epoxy paint applied on the bottom to make it easier to get the final smoothness of the bottom. 


Here we have continued the sanding of the bottom and now it is ready for another epoxy paint layer. That will be applied later when I'm able to paint all the needed layers including the bioside-free antifouling paint from SeaBoost


Then it was time for the big moment and turn the hull for the first time. Everything went well with some extra hands.


From here we will continue with the inside.


More images of that later.

Last week there was very positive news when the Barchetta 26 was nominated Motor boat of the year at the Helsinki boat show Vene 17 Båt. This proves that wooden boats are appreciated.


Friday, February 3, 2017

Sanding and laminating

Last weeks we have learned that sanding, laminating and smoothing takes more time than you plan or even imagine. I started the sanding from the corner parts made of solid mahogany. This part of the work was quite easy and nice to see the final shape forming.


Above you see the boat from the front, in the middle the bow and on the right side one of the back corners, after sanding.

After the sanding and cleaning the surfaces it was time to apply glass fiber and epoxi. Below you see the side of the boat after applying one layer of glass fiber and epoxi. 


Below a closeup of the surface which needs a number of more layers of epoxy to get the glass fiber to disappear and ready for the varnish.


Here we also have the bottom covered with glass fiber and epoxi.


After this follows sanding, washing, more epoxi, sanding washing and more epoxi, .... until the surface is smooth and ready for some paint and varnish. 


The paint and varnish is ordered but let's see when it will be time for that stage. Before that, some more layers of epoxi. Yes and I ordered also some more epoxi.
One good thing is that we have already learned a lot how to laminate and how to get a smooth layer. I'm confident that these steps will be quicker next time.

I hope you have patience, until next update.


Thursday, January 19, 2017

All panels attached

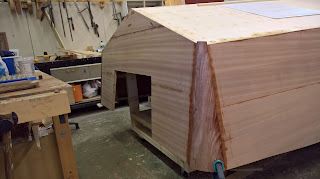
Two weeks of gluing panels are behind and the form of the boat starts to be easier to visualize now. 
We started with the upper panels as they were easier to attach and possible to press with clams from both sides.


For the lower panels we needed to fix some extra support and use different types of wedges to get all surfaces tight enough for the gluing to be successful.


Here below we have the last panel glued. By the way if I haven't mentioned it earlier, the panel material I use is a new innovative boat planking material made by Vendia Woods with the surface of mahogany. Vendia is also writing a blog where you can read more about the material and of different boat projects utilizing their products.


Next step was to start forming the back corner parts and the bow. First tricky thing was to figure out the radius of outer surfaces.


I started by cutting and roughly forming the parts with the circular saw. These parts are made of massive mahogany.


The actual forming was made with the hand plane. Mahogany is quite a hard material so it was good work-out for couple of hours.


I ended the day with attaching the corner parts and the bow. 
Next week will be filled with sanding and some more sanding to get the hull ready for some surface treatment.


Please come back next week to see what the sanded hull looks like.


Monday, January 9, 2017

Back from the Christmas break

We left all our boat projects resting at the school for the Christmas break.


On the second last day of the year I got a phone call from the courier that they would like to bring me some boat planks I ordered two weeks earlier from Vendia Woods. I was positively surprised by the fast delivery of this late Christmas "present". 

  First thing today when we started the spring semester was to unpack the package from Vendia Woods.


I found some nicely smelling mahogany boat planking. This is the material I will use when continuing with my boat project. 

We started immediately to model the sides and the transom and got quite far already the first day. Tomorrow we will continue and glue some of the planks.